|
|
||
| Network Testing and Emulation Solutions |
| Requires LANforge 5.2.11 or later. Create a Virtual AP configured for HotSpot 2.0 and RADIUS (802.1x) authentication. Create a MAC-VLAN interface to act as RADIUS server using hostapd. Configure back-end tools authenticate EAP-SIM. Create and configure LANforge WiFi station to test authentication. This example uses two LANforge CT520 systems but the procedure should work on all CT521, CT522, CT523 and CT525 systems. Information here should be useful for non-LANforge users creating their own AP using the hostapd program. This example uses LANforge for all components, so it is both the test gear and the system under test. This cookbook is primarily intended to record information on how to set up various components of an HS20 EAP-SIM network for demo purposes. Users may choose to implement sub-sections of this cookbook and replace others with third-party APs, RADIUS servers, etc. 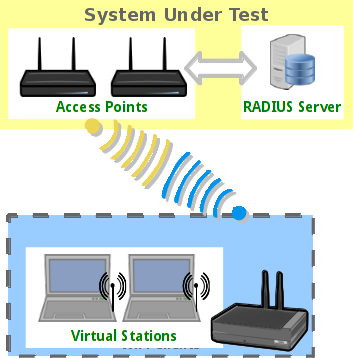 |

|
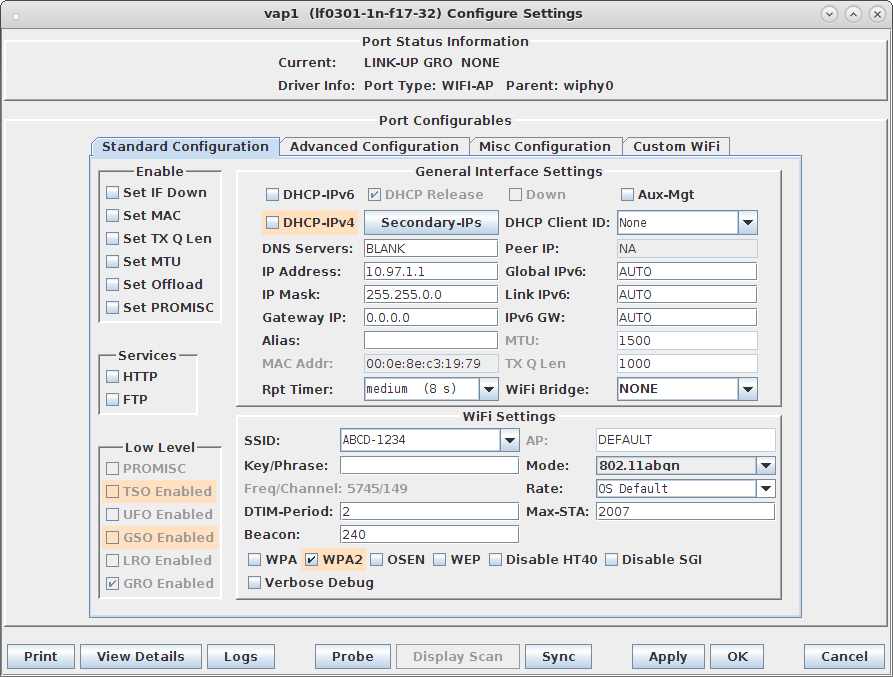
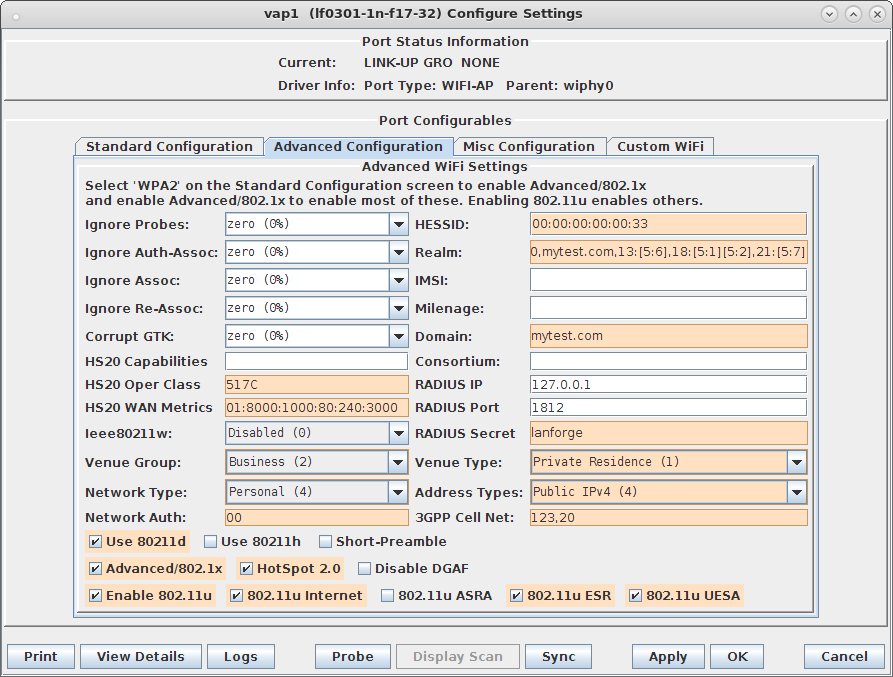
interface=vap1
driver=nl80211
logger_syslog=-1
logger_syslog_level=2
logger_stdout=-1
logger_stdout_level=2
dump_file=/home/lanforge/wifi/hostapd_vap0.dump
ctrl_interface=/var/run/hostapd
ctrl_interface_group=0
ssid=ABCD-1234
bssid=00:0e:8e:c3:19:79
country_code=US
ieee80211d=1
ieee80211h=0
ieee80211w=0
hw_mode=a
ieee80211n=1
beacon_int=240
dtim_period=2
max_num_sta=2007
rts_threshold=2347
fragm_threshold=2346
preamble=0
macaddr_acl=0
auth_algs=1
ignore_broadcast_ssid=0
# Enable HT modes if you want 300Mbps+ throughput.
#ht_capab=[HT20][HT40-][HT40+][GF][SHORT-GI-20][SHORT-GI-40]
#      [TX-STBC][RX-STBC123][MAX-AMSDU-7935][DSSS_CCK-40][PSMP][LSIG-TXOP-PROT]
ht_capab=[HT20][HT40+][SHORT-GI-40][SHORT-GI-20]
#vht_capab=[HT20][HT80+][HT80-][SHORT-GI-80]
wmm_enabled=1
wmm_ac_bk_cwmin=4
wmm_ac_bk_cwmax=10
wmm_ac_bk_aifs=7
wmm_ac_bk_txop_limit=0
wmm_ac_bk_acm=0
wmm_ac_be_aifs=3
wmm_ac_be_cwmin=4
wmm_ac_be_cwmax=10
wmm_ac_be_txop_limit=0
wmm_ac_be_acm=0
wmm_ac_vi_aifs=2
wmm_ac_vi_cwmin=3
wmm_ac_vi_cwmax=4
wmm_ac_vi_txop_limit=94
wmm_ac_vi_acm=0
wmm_ac_vo_aifs=2
wmm_ac_vo_cwmin=2
wmm_ac_vo_cwmax=3
wmm_ac_vo_txop_limit=47
wmm_ac_vo_acm=0
channel=149
ieee8021x=1
own_ip_addr=127.0.0.1
auth_server_addr=127.0.0.1
auth_server_port=1812
auth_server_shared_secret=lanforge
wpa=2
wpa_pairwise=CCMP
wpa_key_mgmt=WPA-EAP WPA-EAP-SHA256
# 802.11u configuration
interworking=1
access_network_type=4
internet=1
asra=1
esr=1
uesa=1
venue_group=2
venue_type=1
hessid=00:00:00:00:00:33
venue_name=eng:LANforge Test Venue
network_auth_type=00
ipaddr_type_availability=04
domain_name=mytest.com
anqp_3gpp_cell_net=123,20
nai_realm=0,mytest.com,13:[5:6],18:[5:1][5:2],21:[5:7]
# HotSpot 2.0 configuration
hs20=1
hs20_oper_friendly_name=eng:LANforge HotSpot 2.0
hs20_wan_metrics=01:8000:1000:80:240:3000
hs20_operating_class=517C
For more information see LANforge User's Guide: Ports (Interfaces)
, VAP Bridge Mode Cookbook , Virtual Router with DHCP Cookbook (Skip the WanLink portion)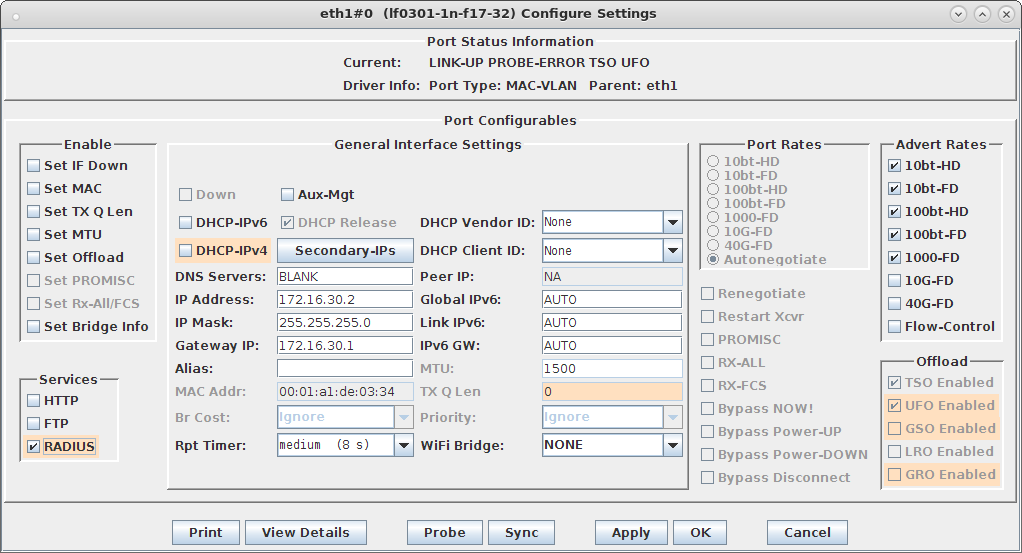
interface=eth1#0
driver=wired
logger_syslog=-1
logger_syslog_level=2
logger_stdout=-1
logger_stdout_level=2
#dump_file=/home/lanforge/wifi/hostapd_eth1#0.dump
ctrl_interface=/var/run/hostapd
ctrl_interface_group=0
ieee8021x=1
eapol_key_index_workaround=0
eap_server=1
eap_user_file=/etc/hostapd.eap_user
server_id=lf0301.mytest.com
eap_sim_db=unix:/tmp/hlr_auc_gw.sock
radius_server_auth_port=1812
radius_server_clients=/etc/hostapd.radius_clients

ca_cert=/etc/raddb/certs/ca.pem
server_cert=/etc/raddb/certs/server.pem
private_key=/etc/raddb/certs/server.key
private_key_passwd=lanforge
192.168.100.0/24 lanforge
127.0.0.1/24 lanforge
"*@mytest.com" TLS
"0"* SIM,TTLS,TLS,PEAP,AKA
"1"* SIM,TTLS,TLS,PEAP,AKA
# Parameters for Milenage (Example algorithms for AKA).
# The example Ki, OPc, and AMF values here are from 3GPP TS 35.208 v6.0.0
# 4.3.20 Test Set 20. SQN is the last used SQN value.
# These values can be used for both UMTS (EAP-AKA) and GSM (EAP-SIM)
# authentication. In case of GSM/EAP-SIM, AMF and SQN values are not used, but
# dummy values will need to be included in this file.
# IMSI Ki OPc AMF SQN
232010000000000 90dca4eda45b53cf0f12d7c9c3bc6a89 cb9cccc4b9258e6dca4760379fb82581 61df 000000000000

# These values are from Test Set 19 which has the AMF separation bit set to 1
# and as such, is suitable for EAP-AKA' test.
555444333222111 5122250214c33e723a5dd523fc145fc0 981d464c7c52eb6e5036234984ad0bcf c3ab 16f3b3f70fc1
cd /home/lanforgeNOTE: If the hlr_auc_gw does not start, you may have to remove the file /tmp/hlr_auc_gw.sock first.
. lanforge.profile
hlr_auc_gw -m /etc/hlr_auc_gw.milenage_db > /tmp/hlr_auc_gw.log &
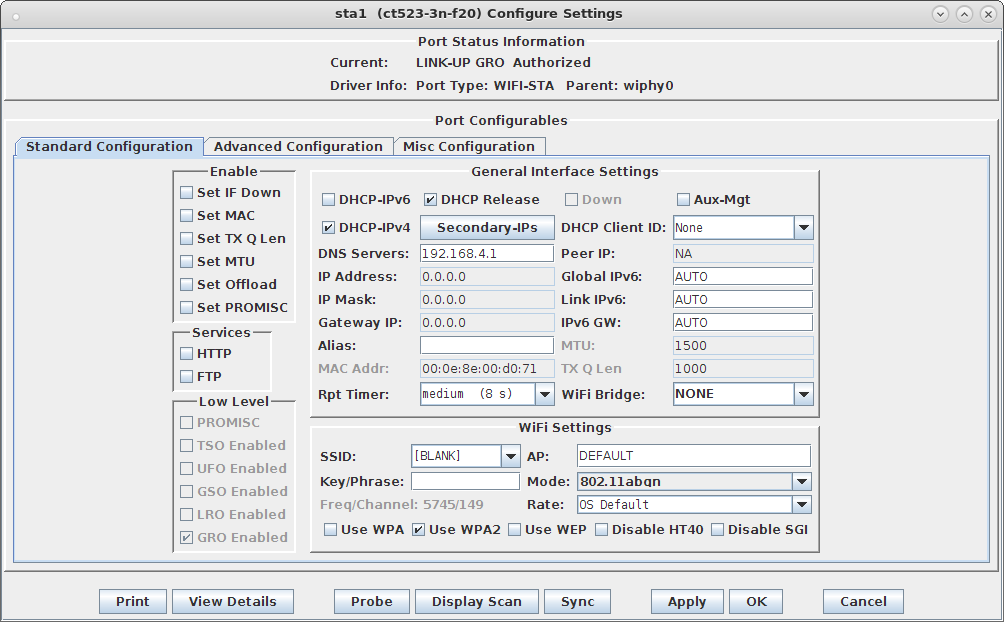
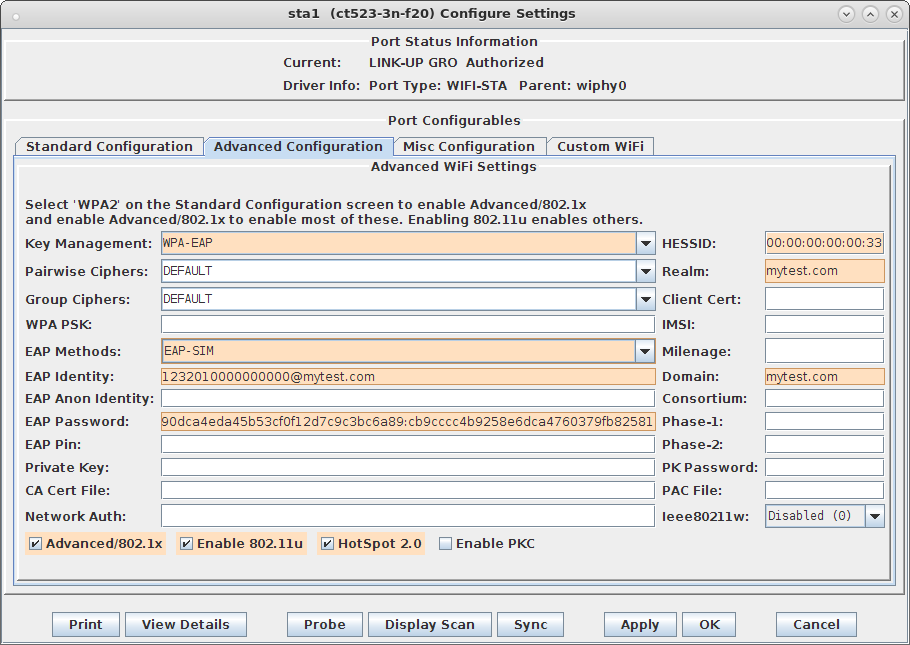
ctrl_interface=/var/run/wpa_supplicant
fast_reauth=1
concurrent_assoc_ok=1
scan_cur_freq=1
min_scan_gap=5
p2p_disabled=1

# 802.11u / Interworking configuration.
interworking=1
hessid=00:00:00:00:00:33
auto_interworking=1
access_network_type=0
# HotSpot 2.0 configuration
hs20=1
bss_max_count=2000
network={
    interworking_defaults=1
    disable_ht=0
    disable_vht=1
    disable_ht40=0
    disable_sgi=0
    ht_mcs=""
    disable_max_amsdu=-1
    ampdu_factor=-1
    ampdu_density=-1
}
cred={
    username="1232010000000000@mytest.com"
    password="90dca4eda45b53cf0f12d7c9c3bc6a89:cb9cccc4b9258e6dca4760379fb82581"
    realm="mytest.com"
    domain="mytest.com"
    eap=SIM
}
For more information see WiFi Station Cookbook