Candela Technologies Logo
Network Testing and Emulation Solutions

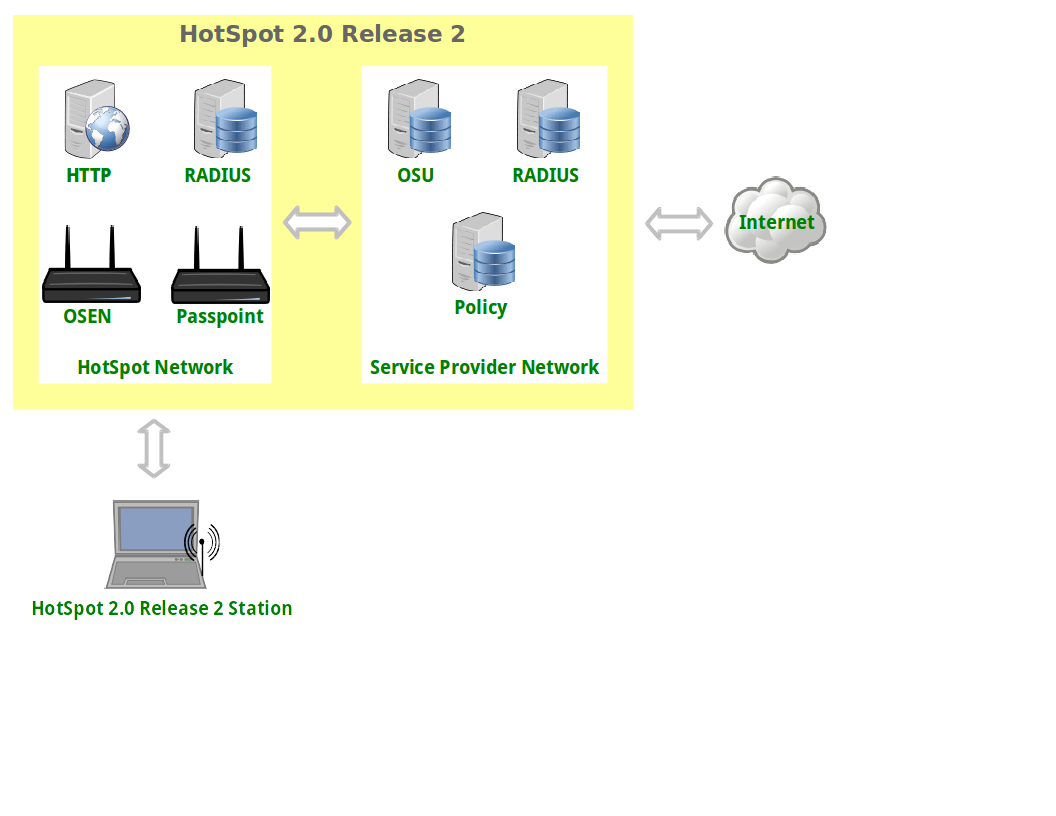
LANforge WiFi testing HotSpot 2.0 Release 2

Goal: Setup HotSpot 2.0 Release 2 Example

Requires LANforge 5.4.2 or later on Fedora 20 or later (this example is using Fedora 27). VRF must be enabled (it is enabled by default). One LANforge system will be used as the AP side, and a second LANforge machine will be the WiFi station.
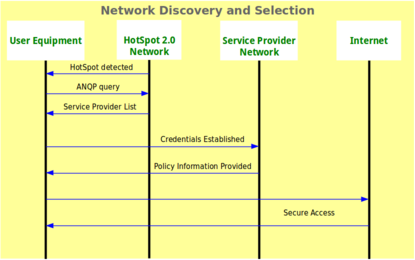
  • Run LANforge install script to begin setup of HotSpot 2.0 R2 related servers and certificates.
  • Configure the OSU Server-only authenticated layer-2 Encryption Network (OSEN) AP and Passpoint AP.
  • Initiate Online Sign-Up (OSU) procedure, select a provider and obtain an IP address from the Passpoint AP.
  • Send traffic through the Service Provider Network.


For more information see:
WiFi Alliance Passpoint Release 2 Deployment Guidelines
https://www.wi-fi.org/file/passpoint-release-2-deployment-guidelines
 
  1. Run LANforge installation script to begin hostapd RADIUS, certificates and HotSpot 2.0 setup, as root user:
    cd /home/lanforge
    ./lf_kinstall.pl --do_radius --do_hs20 --force_new_certs 
  2. Make two copies of the ca.pem certificate to different directories:
    cp /home/lanforge/hs20/ca/ca.pem /home/lanforge/osu-ca.pem
    cp /home/lanforge/hs20/ca/ca.pem /home/lanforge/ota-ca.pem
    #On station machine, if different from AP machine
    cp /home/lanforge/hs20/ca/ca.pem /home/lanforge/wifi/osu_wlan2/osu-ca.pem
    ota-ca.pem is used by the client for Over-The-Air authentication to the OSEN AP
    osu-ca.pem is used by the client for the Online-Sign-Up server authentication before connecting to the Passpoint AP

    Copy the ca.pem from the LANforge AP system to the LANforge Station system. And, if you are using a third-party client, then you will need to somehow install the ca.pem on it.
  3. Create two MAC-VLANs for two hostapd RADIUS server instances.
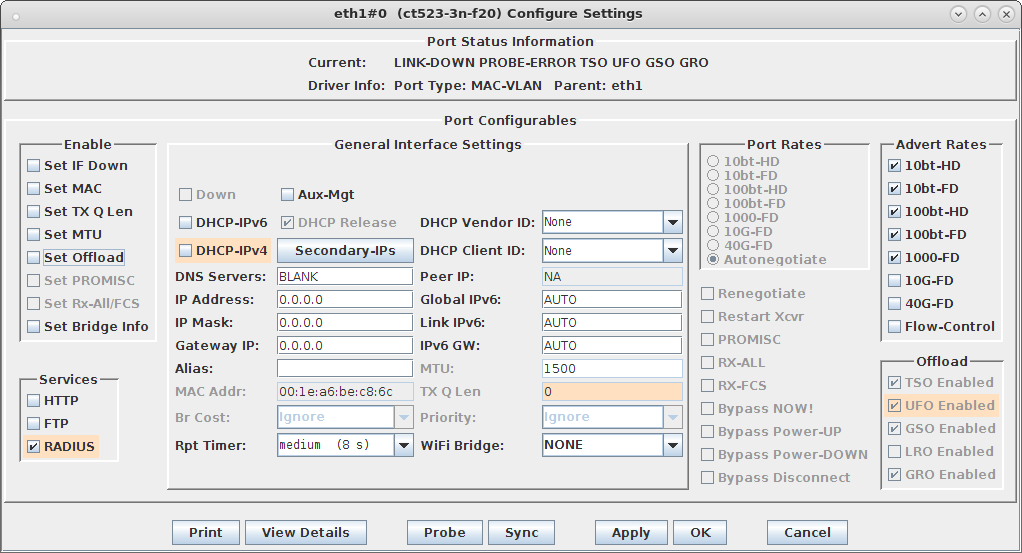
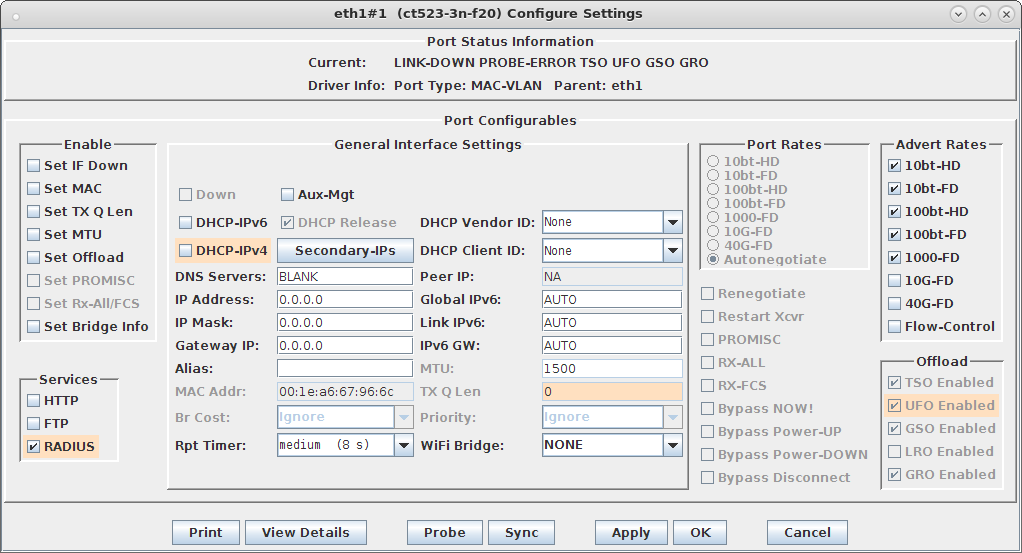
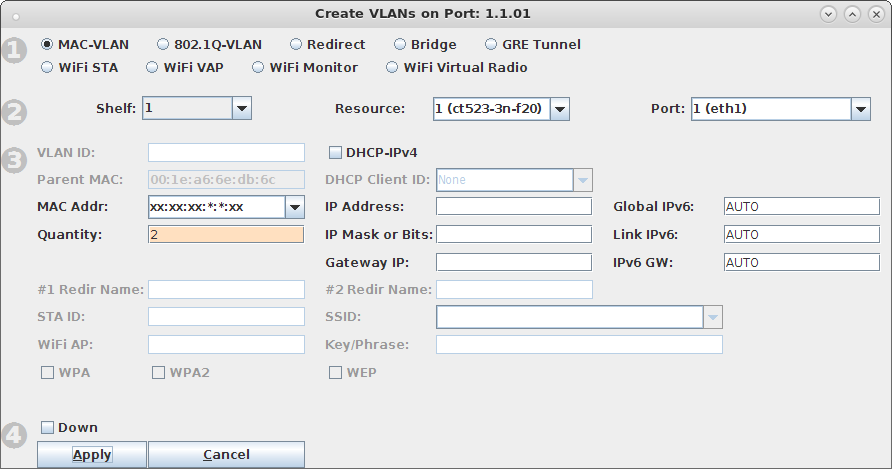
    1. Go to the Port Manager tab, select eth1, select Create, select MAC-VLAN, quantity 2 then Apply. screenshot
    2. Double-click each new MAC-VLAN interface in the Port-Mgr tab to modify. Select the RADIUS checkbox which will allow a hostapd based RADIUS server on the interfaces using the config files:
      /home/lanforge/wifi/hostapd_eth1#0.conf and /home/lanforge/wifi/hostapd_eth1#1.conf

      In an all-in-one example, the hostapd RADIUS servers will be referenced by localhost and each MAC-VLAN interface will not need an IP address assigned. If the hostapd RADIUS servers were on different systems or networks, or need to be accessed from outside the LANforge system, the appropriate IP address would be assigned here.
    3. Create config file. You will need to change the server_id to match your hostname.
      /home/lanforge/wifi/hostapd_eth1#0.conf for the hostapd RADIUS server on eth1#0.
      NOTE: The eap_user_file, eap_sim_db and radius_server_auth_port are unique for each RADIUS server.
      interface=eth1#0
      driver=wired
      logger_syslog=-1
      logger_syslog_level=2
      logger_stdout=-1
      logger_stdout_level=2
      dump_file=/home/lanforge/wifi/hostapd_eth1#0.dump
      ctrl_interface=/var/run/hostapd
      ctrl_interface_group=0
      ieee8021x=1
      eapol_key_index_workaround=0
      eap_server=1
      eap_user_file=/home/lanforge/hs20/AS/hostapd-osen.eap_user
      server_id=ct523-3n-f20
      eap_sim_db=unix:/tmp/hlr_auc_gw.sock
      radius_server_auth_port=1820
      radius_server_clients=/home/lanforge/hs20/AS/hostap.radius_clients
      
      ca_cert=/home/lanforge/hs20/ca/ca.pem
      server_cert=/home/lanforge/hs20/ca/server.pem
      private_key=/home/lanforge/hs20/ca/server.key
      private_key_passwd=lanforge
      
      ocsp_stapling_response=/home/lanforge/hs20/ca/ocsp-server-cache.der
      
    4. Create config file. You will need to change the server_id to match your hostname.
      /home/lanforge/wifi/hostapd_eth1#1.conf for the hostapd RADIUS server on eth1#1.
      NOTE: The eap_user_file, eap_sim_db and radius_server_auth_port are unique for each RADIUS server.
      interface=eth1#1
      driver=wired
      logger_syslog=-1
      logger_syslog_level=2
      logger_stdout=-1
      logger_stdout_level=2
      dump_file=/home/lanforge/wifi/hostapd_eth1#1.dump
      ctrl_interface=/var/run/hostapd
      ctrl_interface_group=0
      ieee8021x=1
      eapol_key_index_workaround=0
      eap_server=1
      eap_user_file=sqlite:/home/lanforge/hs20/AS/DB/eap_user.db
      server_id=ct523-3n-f20
      eap_sim_db=unix:/tmp/hlr_auc_gw.sock db=/home/lanforge/hs20/AS/DB/eap_sim.db
      radius_server_auth_port=1821
      radius_server_clients=/home/lanforge/hs20/AS/hostap.radius_clients
      
      ca_cert=/home/lanforge/hs20/ca/ca.pem
      server_cert=/home/lanforge/hs20/ca/server.pem
      private_key=/home/lanforge/hs20/ca/server.key
      private_key_passwd=lanforge
      
      ocsp_stapling_response=/home/lanforge/hs20/ca/ocsp-server-cache.der
      
    5. Start the hlr_auc_gw tool:
      cd /home/lanforge
      . lanforge.profile
      hlr_auc_gw -m /etc/hlr_auc_gw.milenage_db > /tmp/hlr_auc_gw.log &
      NOTE: If the hlr_auc_gw does not start, you may have to remove the file /tmp/hlr_auc_gw.sock first.
    6. Reset the MAC-VLAN interfaces on the Port Mgr tab so that the new hostapd RADIUS servers are started. Check that they are running with the command:
      ps auxwww |grep hostapd_eth

      If they are not running, check the log files for problems:
      cat /home/lanforge/wifi/hostapd_log_eth1#0.txt
      cat /home/lanforge/wifi/hostapd_log_eth1#1.txt
  4. Create two VAPs for the HotSpot 2.0 Release 2 Network. Skip this section if you are using third-party APs in this test.
    1. Go to the Port Mgr tab and create one VAP on wiphy0 and one VAP on wiphy1.
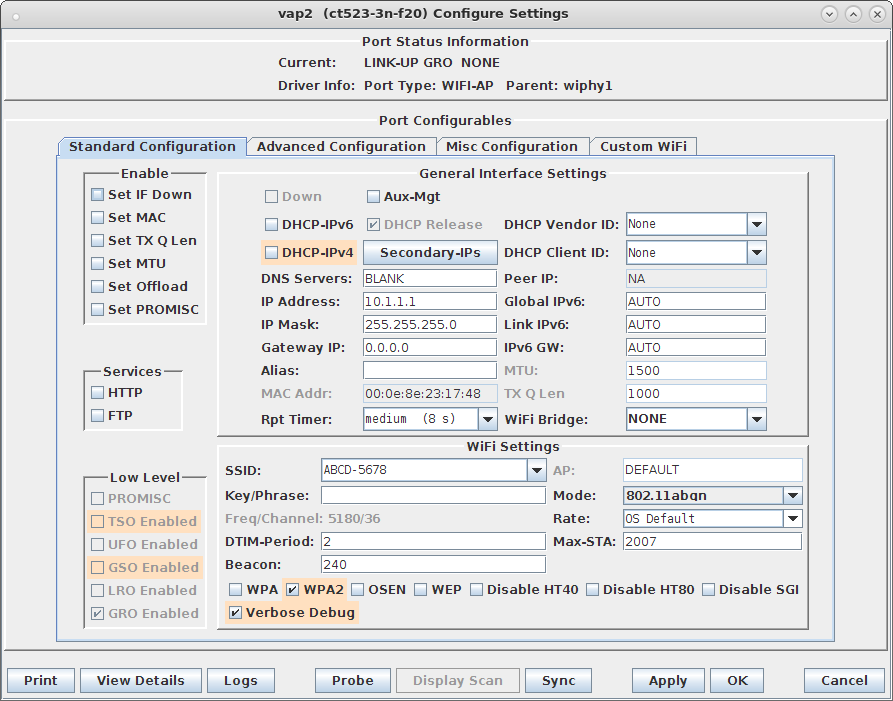
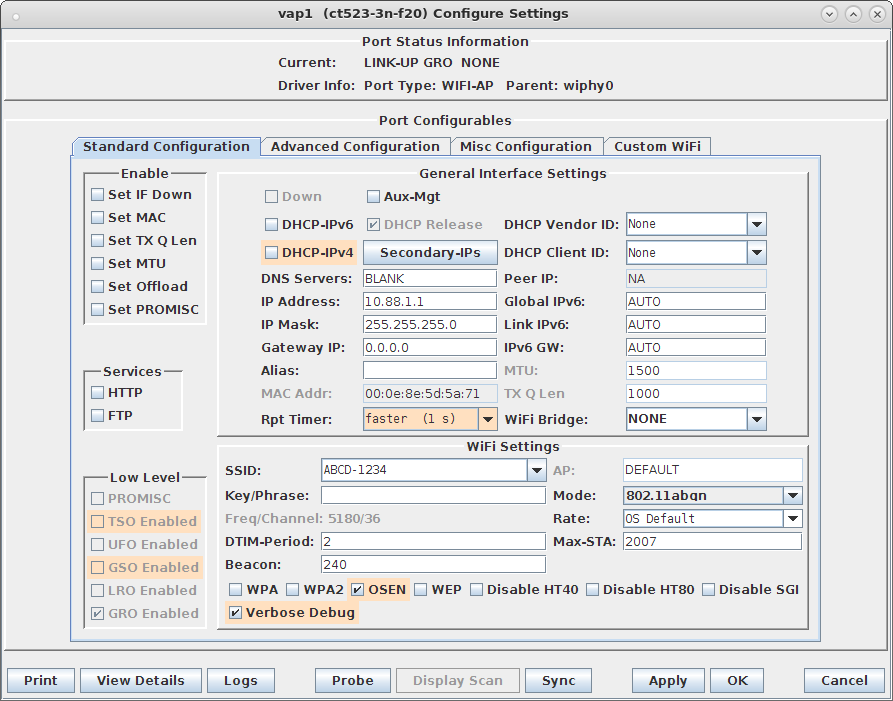
    2. Modify the first VAP on wiphy0 to be the OSEN AP. Configure IP Address and SSID. screenshot
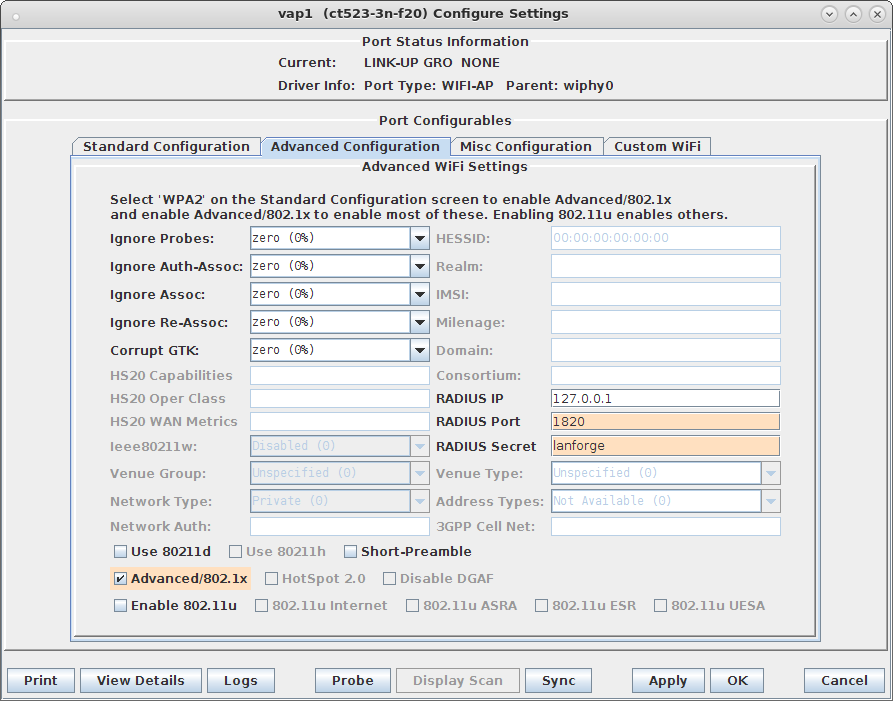
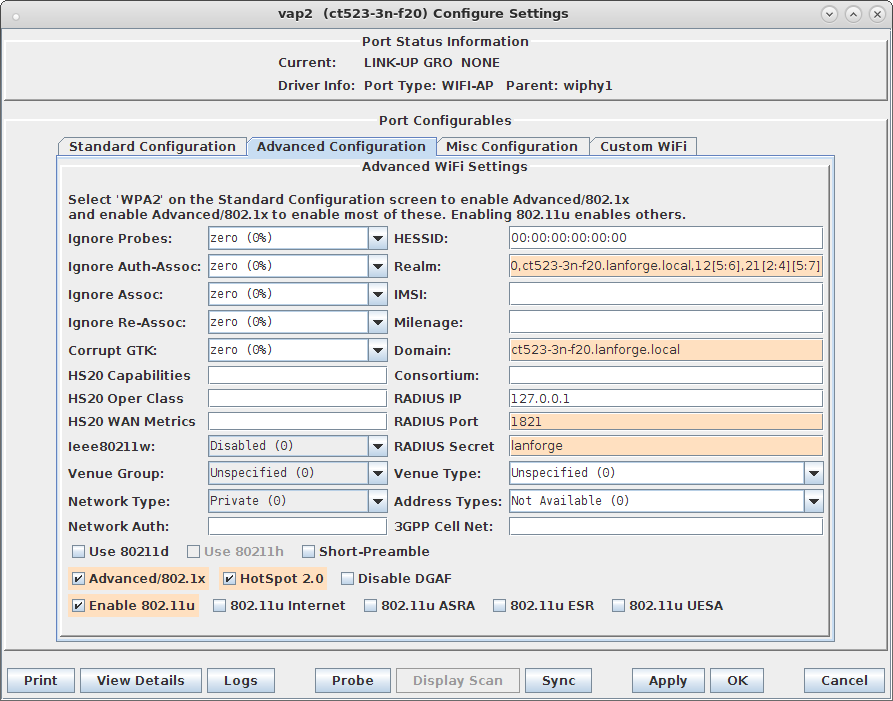
    3. Select the Advanced Configuration tab in the Port-Modify window to configure 802.1x and RADIUS server information. screenshot
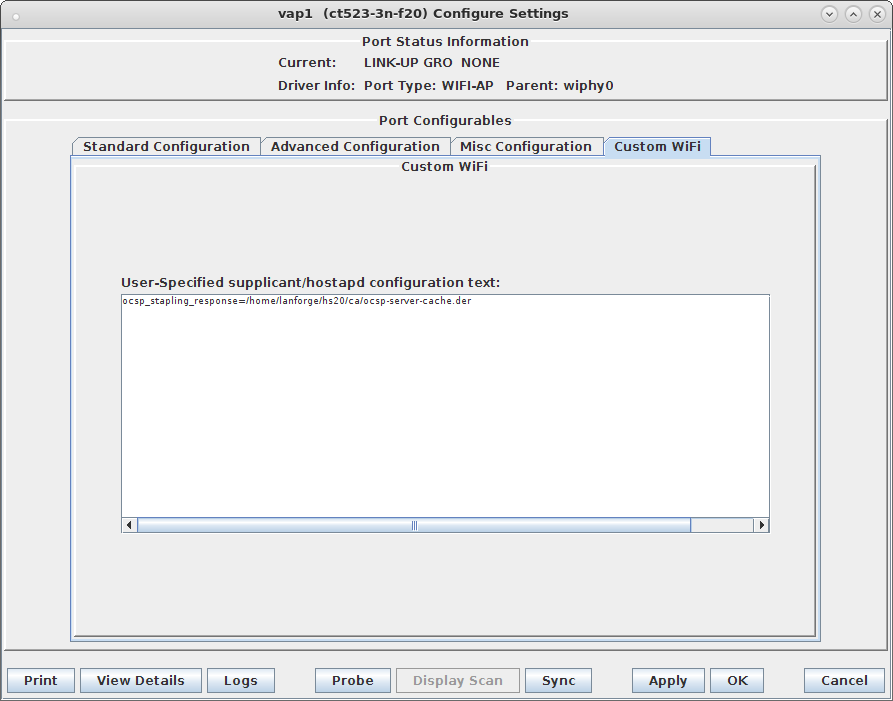
    4. Select the Custom WiFi tab to add the following lines for HotSpot 2.0 Release 2.
      ocsp_stapling_response=/home/lanforge/hs20/ca/ocsp-server-cache.der
      screenshot
    5. Modify the second VAP on wiphy1 to be the Passpoint AP. Configure IP Address and SSID. screenshot
    6. Select the Advanced Configuration tab in the Port-Modify window to configure 802.1x, 802.1u, HotSpot 2.0, RADIUS server and other information. screenshot
    7. Select the Custom WiFi tab to add the following lines for HotSpot 2.0 Release 2. The hostname in the URL will need to match your actual hostname.
      hs20_icon=64:64:eng:image/png:logo-64x64.png:/home/lanforge/hs20/www/logo-64x64.png
      osu_ssid="ABCD-1234"
      osu_server_uri=https://osu-server.ct523-3n-f20.lanforge.local/hs20/spp.php/signup?realm=ct523-3n-f20.lanforge.local
      osu_friendly_name=eng:LANforge HS20 Operator
      osu_nai=osen@lanforge.com
      osu_method_list=1 0
      osu_icon=logo-64x64.png
      osu_service_desc=eng:LANforge Example services
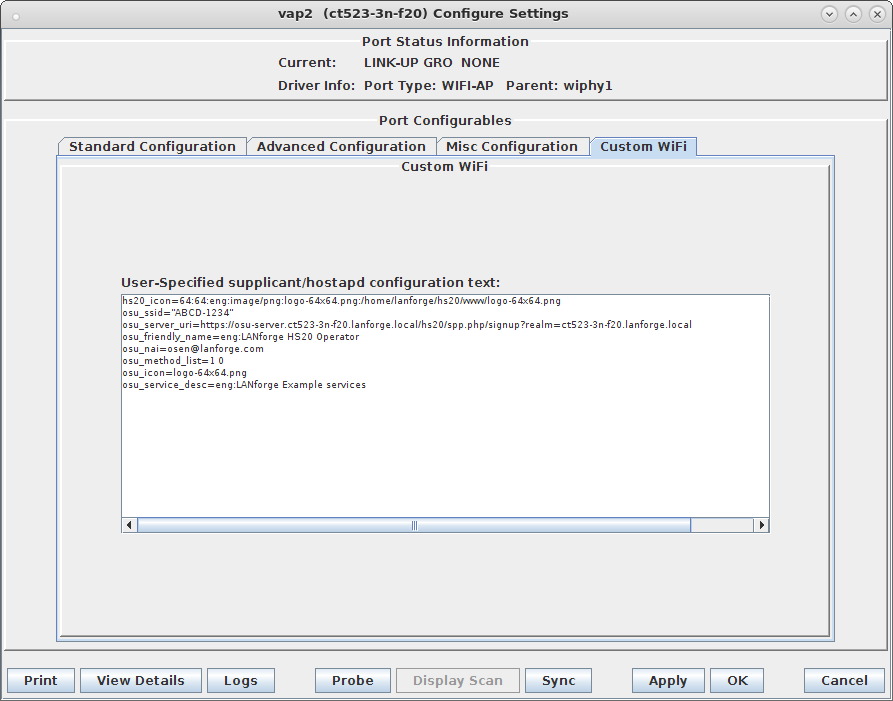
      
      screenshot
    8. Example hostapd config file for OSEN AP
      Example hostapd config file for WPA2 + ANQP AP. These were re-created after the fact, its possible that there is a typo, and the hostname differs from the instructions in this example.
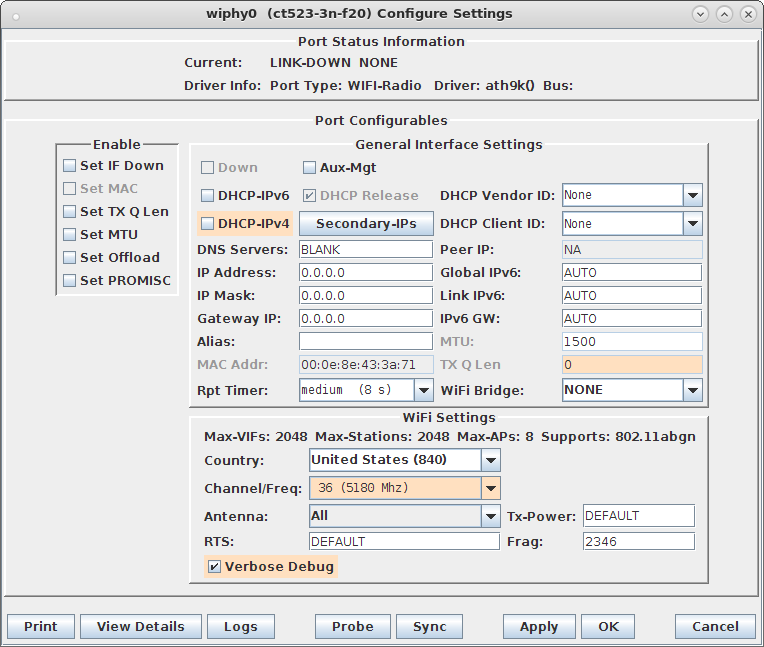
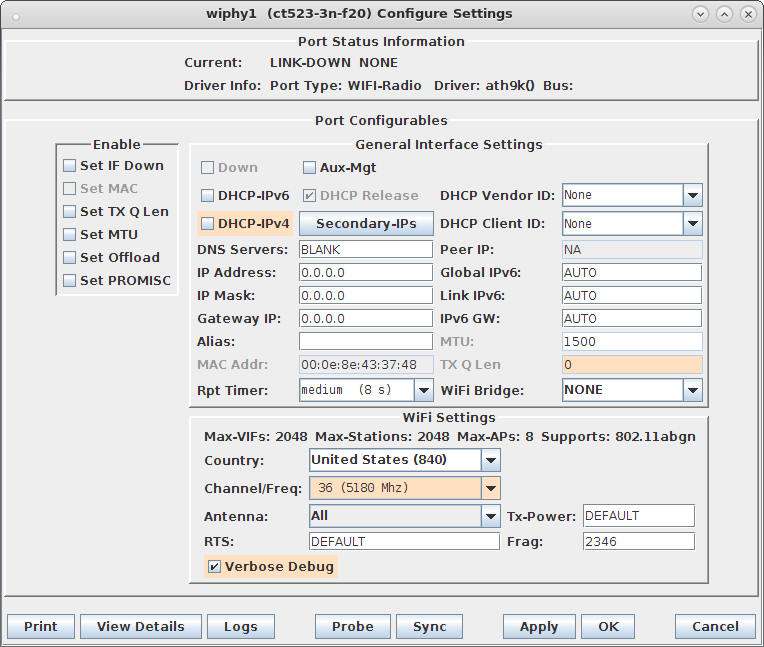
    9. Modify wiphy0 and wiphy1 to be on the same channel and select OK. This should only be needed if you are trying to connect multiple LANforge virtual stations to the APs. If using a single station or a third-party device, the channels should not matter.

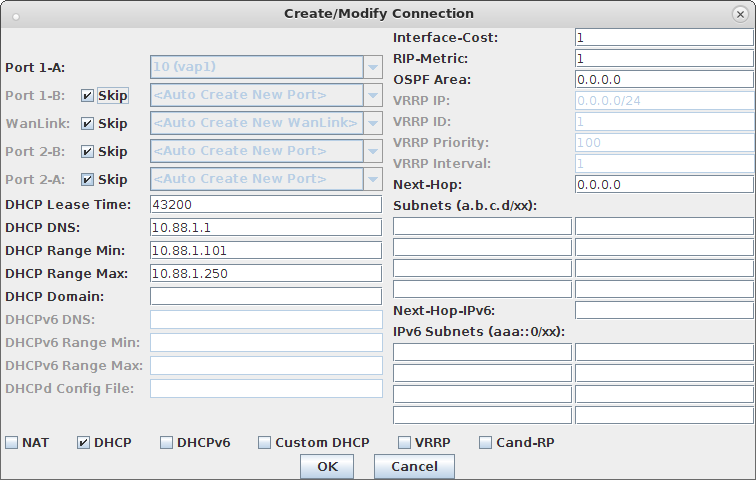
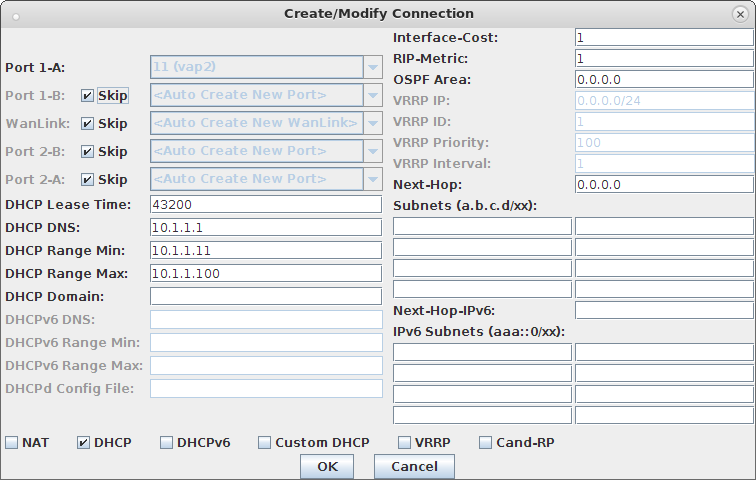
    10. In Netsmith, create a Virtual router called OSEN for vap1 and PASSPOINT for vap2, place vap in their respective virtual routers. Setup each VAP with DHCP Service on different IP networks.


    11. Check that the VAP hostapd processes are running with the command:
      ps auxwww |grep hostapd_vap

      If they are not running, check the log files for problems:
      tail -f /home/lanforge/wifi/hostapd_log_vap1.txt
      tail -f /home/lanforge/wifi/hostapd_log_vap2.txt
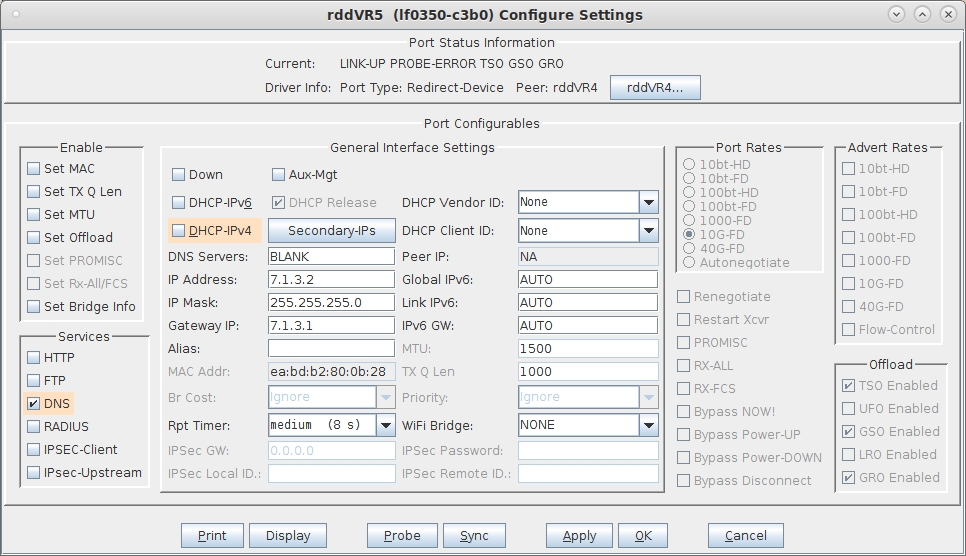
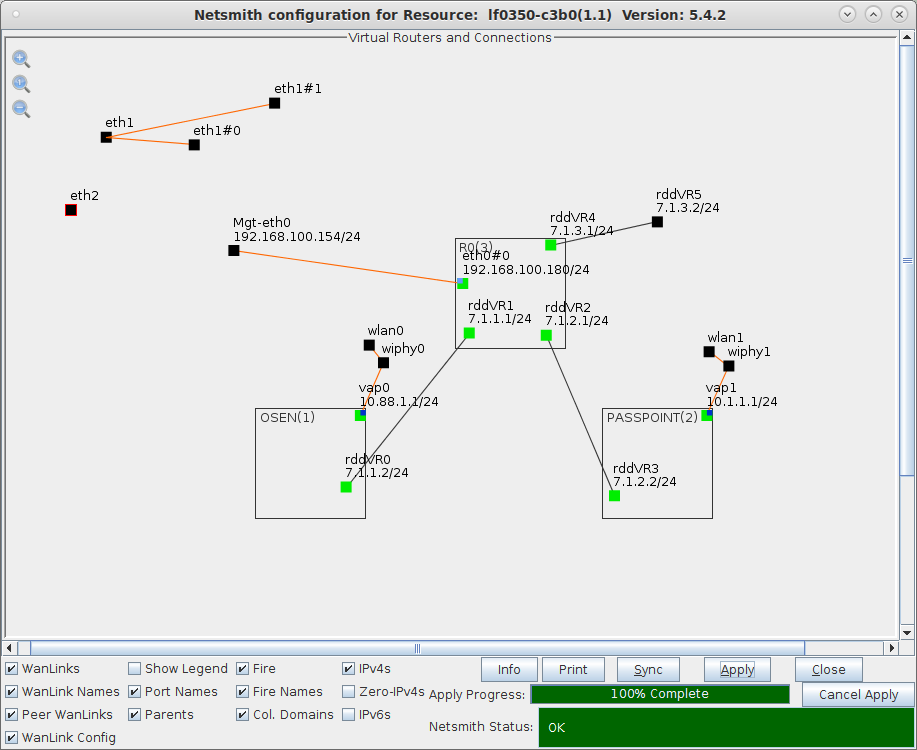
    12. Create another virtual router to tie the OSEN and AP virtual routers together. Connect them with Netsmith connections (skipping WanLinks unless you are sure you want them.) Create another virtual port connection to run the OCSP responder and the local DNS server. Select the 'DNS' service. Make sure the default gateway points back towards rddVR4 in the virtual router. In this example, the OCSP responder interface is called rddVR5 screenshot
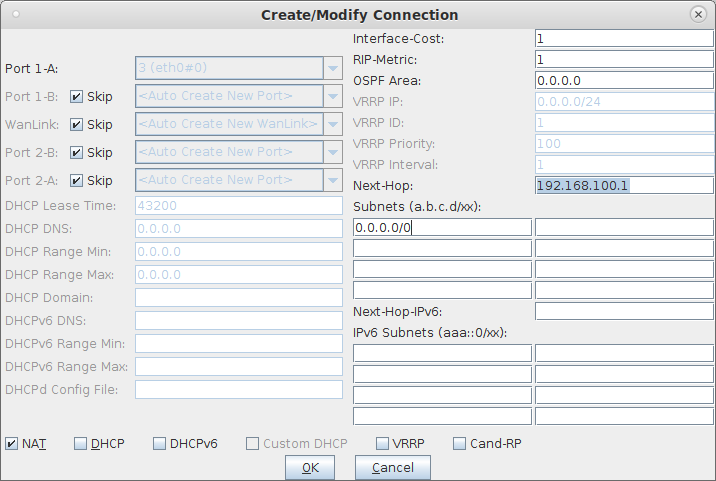
    13. Create a MAC-VLAN on the management port (or use some other port that can reach the internet). Drag this into the top virtual router, and configure Netsmith to use it for the default gateway by setting up the Next Hop and the 0.0.0.0/0 destination. Select NAT as well. screenshot
    14. When the configuration is completed, Netsmith will look something like this. Apply it, wait a minute to let everything settle, and move to the next step screenshot

    For more information see WiFi Testing: Configuring a Virtual AP with Limited Stations

    , Virtual Router with NAT Cookbook , Virtual Router with DHCP Cookbook
  5. Start services on the AP system. You need to do this each time you re-apply Netsmith.
    1. First, make sure that /etc/hosts on the AP system matches the IP addresses for the vap0, vap1, and the ocsp port (as shown in Netsmith). In this example, I added these rows to /etc/hosts:
      ###LANFORGE-HOSTS-START###
      # This section may be over-written by lf_kinstall.pl
      127.0.0.1 osu-client.lf0350-c3b0.lanforge.local
      10.88.1.1 osu-server.lf0350-c3b0.lanforge.local
      127.0.0.1 osu-revoked.lf0350-c3b0.lanforge.local
      10.88.1.1 osu-signup.lf0350-c3b0.lanforge.local
      7.1.3.2 ocsp.lf0350-c3b0.lanforge.local
      ###LANFORGE-HOSTS-STOP###
      
      ###-LF-HOSTAME-NEXT-###
      192.168.100.154 lf0350-c3b0 lanforge-srv
      
    2. Start the Online Certificate Status Protocol (OCSP) script which will restart the OCSP Responder and update the cache once per minute. It is only required on the VAP or server side of a HotSpot 2.0 R2 network. Currently you will need to manually clean up old processes if you are re-doing this step.
      su - root
      cd /home/lanforge
      . lanforge.profile
      vrf_exec.bash rddVR5 ./ocsp.bash > /dev/null 2>&1 &
      
    3. Start Apache httpd configured for HS20 on the Osen AP. You may need to manually stop old httpd processes.
      vrf_exec.bash vap0 httpd -f /etc/httpd/conf/httpd-hs20.conf
  6. This is the start of the Station side configuration. Do these actions on the Station LANforge system.
    Create devinfo.xml and devdetail.xml files in /home/lanforge/wifi/osu_wlan2
    1. /home/lanforge/wifi/osu_wlan2/devinfo.xml
      <DevInfo xmlns="urn:oma:mo:oma-dm-devinfo:1.0">
              <DevId>urn:Example:HS20-station:123456</DevId>
              <Man>Manufacturer</Man>
              <Mod>HS20-station</Mod>
              <DmV>1.2</DmV>
              <Lang>en</Lang>
      </DevInfo>
    2. /home/lanforge/wifi/osu_wlan2/devdetail.xml
      <DevDetail xmlns="urn:oma:mo:oma-dm-devdetail:1.0">
              <Ext>
                      <org.wi-fi>
                              <Wi-Fi>
                                      <EAPMethodList>
                                              <EAPMethod1>
                                                      <EAPType>13</EAPType>
                                              </EAPMethod1>
                                              <EAPMethod2>
                                                      <EAPType>21</EAPType>
                                                      <InnerMethod>MS-CHAP-V2</InnerMethod>
                                              </EAPMethod2>
                                              <EAPMethod3>
                                                      <EAPType>18</EAPType>
                                              </EAPMethod3>
                                              <EAPMethod4>
                                                      <EAPType>23</EAPType>
                                              </EAPMethod4>
                                              <EAPMethod5>
                                                      <EAPType>50</EAPType>
                                              </EAPMethod5>
                                      </EAPMethodList>
                                      <ManufacturingCertificate>false</ManufacturingCertificate>
                                      <Wi-FiMACAddress>020102030405</Wi-FiMACAddress>
                                      <IMSI>310026000000000</IMSI>
                                      <IMEI_MEID>imei:490123456789012</IMEI_MEID>
                                      <ClientTriggerRedirectURI>http://localhost:12345/</ClientTriggerRedirectURI>
                                      <Ops>
                                              <launchBrowserToURI></launchBrowserToURI>
                                              <negotiateClientCertTLS></negotiateClientCertTLS>
                                              <getCertificate></getCertificate>
                                      </Ops>
                              </Wi-Fi>
                      </org.wi-fi>
              </Ext>
              <URI>
                      <MaxDepth>0</MaxDepth>
                      <MaxTotLen>0</MaxTotLen>
                      <MaxSegLen>0</MaxSegLen>
              </URI>
              <DevType>MobilePhone</DevType>
              <OEM>Manufacturer</OEM>
              <FwV>1.0</FwV>
              <SwV>1.0</SwV>
              <HwV>1.0</HwV>
              <LrgObj>false</LrgObj>
      </DevDetail>
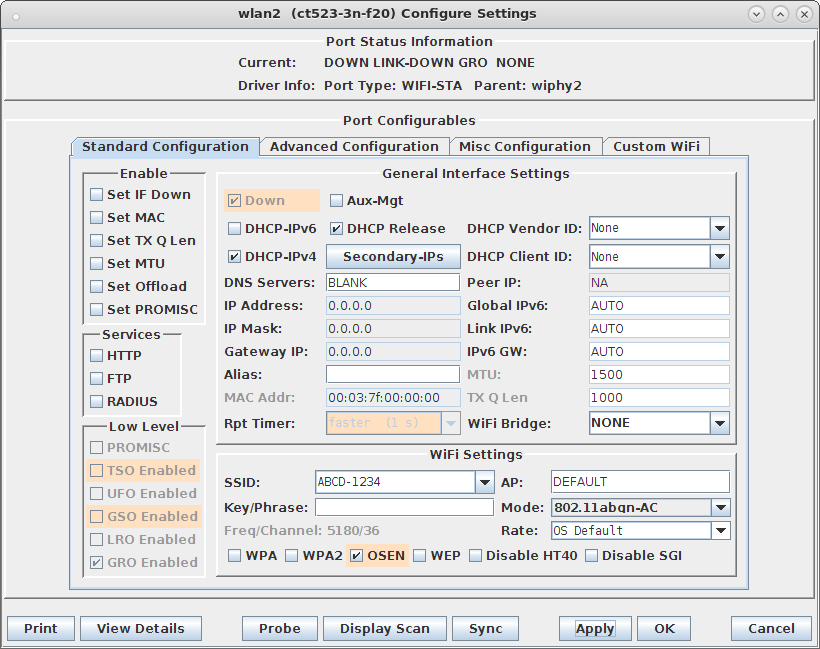
      
  7. Setup wlan2 as the HotSpot 2.0 R2 client.
    1. Modify wlan2 on the Port Mgr tab and set the SSID to the OSEN AP's SSID 'ABCD-1234' in this example and set the authentication to OSEN.
      screenshot
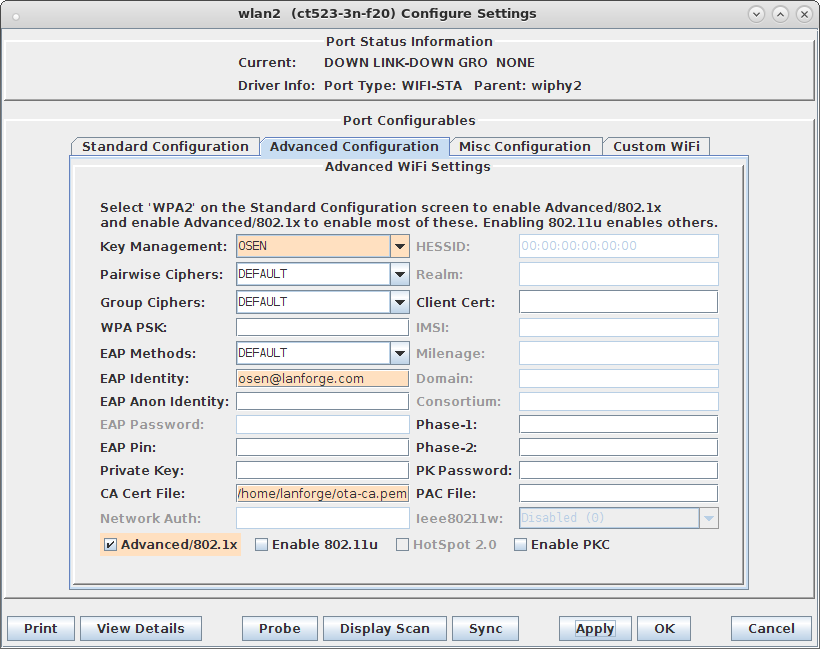
    2. In wlan2 Advanced WiFi Settings, select Advanced/802.1x, set Key Management, EAP Identity and CA Cert File.
      screenshot
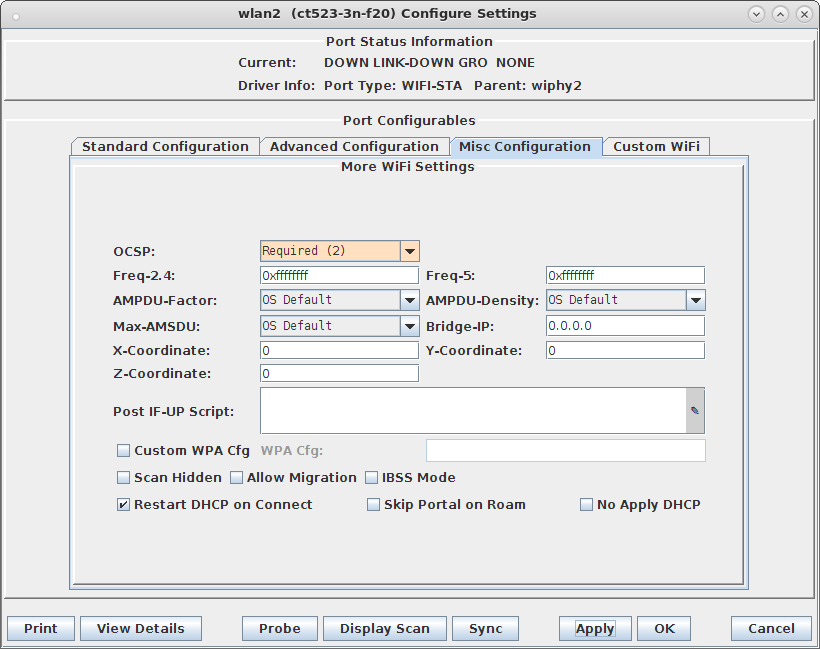
    3. In wlan2 Misc Configuration, set OCSP to Required.
      screenshot
    4. Admin up wlan2 and it will associate with the OSEN AP and obtain an IP address on the OSEN AP IP network.
  8. Initiate Online Sign-Up
    1. Some notes about the following command: We use the LD_PRELOAD trick to override the default DNS servers in the hs20-osu-client program. This means you need to know the DNS ahead of time, and set it with the NAMESERVER environment variable. A second DNS server could be set as NAMESERVER2. In a terminal window type the following:
      cd /home/lanforge/wifi/osu_wlan2
      LD_PRELOAD=/home/lanforge/local/lib/resolvconf-override.so NAMESERVER1=7.1.3.2 \
         vrf_exec wlan2 ~lanforge/local/hs20/client/hs20-osu-client -x /home/lanforge/local/hs20/spp/spp.xsd -dd -S wlan2 signup
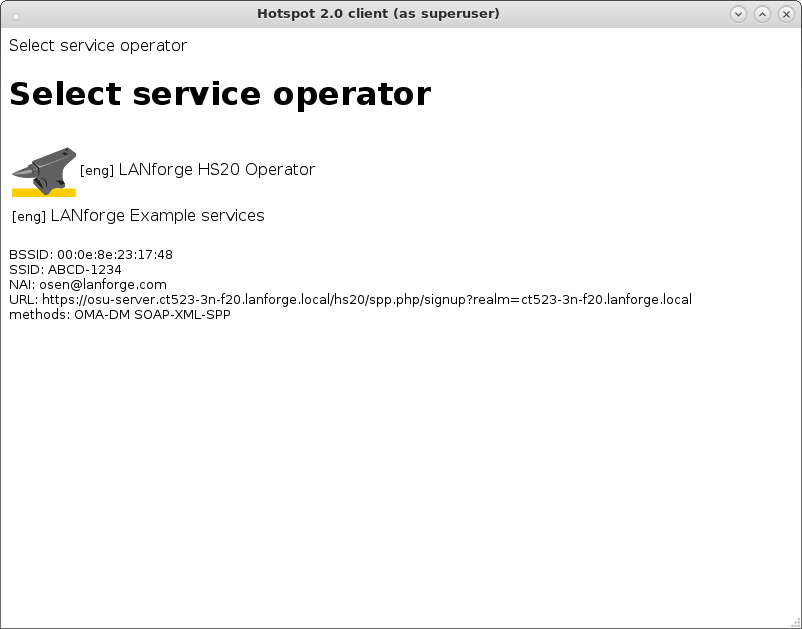
      
    2. Select 'LANforge HS20 Operator' from the Service Provider List.
      screenshot
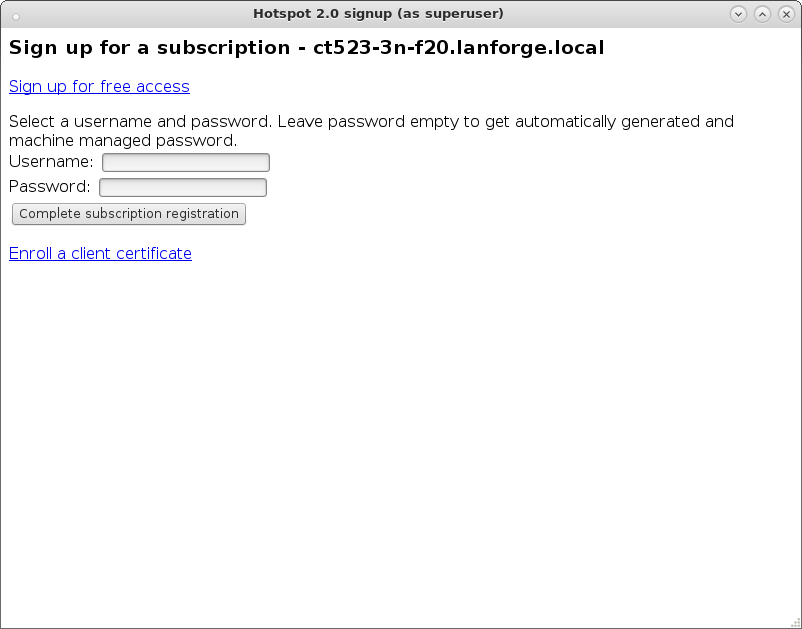
    3. Select 'Sign up for free access' from the Online Sign-Up page.
      screenshot
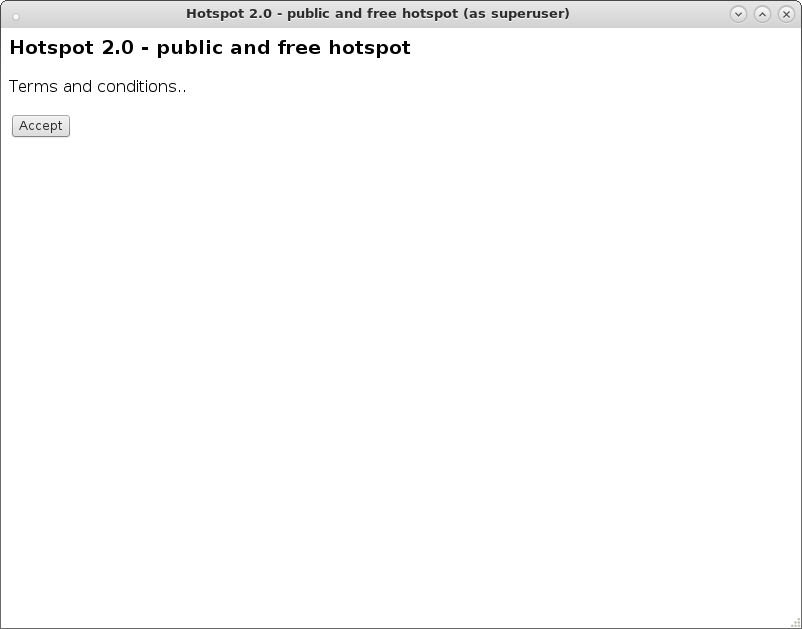
    4. Select the Accept button to complete the Online Sign-Up.
      screenshot
  9. The wlan2 station will obtain an IP address on the Passpoint AP IP network and should be able to access the internet
  10. If wlan2 is reset or reassociates with the OSEN AP, you will have to remove the Service Provider (SP) directory before attempting the Online Sign-Up again.
    cd /home/lanforge/wifi/osu_wlan2
    rm -rf SP
  11. NOTES: We found it very difficult to get all of the details correct in this example. Here are some debug notes and links to certain files that may help others or ourselves debug this in the future.
    1. /etc/hosts on the AP system.
    2. /etc/hosts on the Station system.
    3. apache_hs20_config.tar.gz configuration files.
    4. To debug pem files: openssl x509 -in /home/lanforge/hs20/ca/signup-server.pem -text -noout

Candela  Technologies, 2417 Main Street, Suite 201, Ferndale, WA 98248, USA
www.candelatech.com | sales@candelatech.com | +1.360.380.1618
Facebook | LinkedIn | Blog