Candela Technologies Logo
Network Testing and Emulation Solutions

CI/CD Lights-Out Chamber Setup

Goal: Assemble a LANforge and a device under test (DUT) to operate in an unattended lab setup.

The CI/CD lights-Out chamber is composed of a CT840a chamber, a CT523c LANforge and a test-controller[1], that connects to them via serial and Ethernet.
1) A test controller is a Linux system that can be remotely accessed, and does not need LANforge installed.

Inside the chamber we have:

  • a remotely controlled power switch
  • a powered USB hub for connecting serial ports of the LANforge and DUT
  • a LED lamp
  • a USB camera connected to the LANforge machine
  • a short table to place above the LANforge for the DUT
  • the LANforge machine
  • the DUT
Once assembled, this setup can perform a battery of connectivity and traffic tests that do not require a programmable attenuator. Requires LANforge 5.4.2.
 
  1. Parts review

    Let's review the parts the chamber setup requires:
    1. Cables include: screenshot
      1. 3 cat5e cables
      2. 2 cat6 cables
      3. 1 USB serial adapter
      4. 1 DB9 female-female cable
      5. Also shown are annenas, with-pin
    2. You will also get two small monitor stands and a network power switch. You will be using the legs of both, but discarding one of the stand tops. screenshot
    3. You will be getting a LED lamp, a USB camera, 8 port network switch, USB hub, camera clamp, USB A-A cables.
    4. Your chamber will come with a universal power strip, AC power cord, fan AC-DC power adapter, and a printed test report. This assembly guide does not use the universal power strip. You might find a use for it. screenshot
    5. Your chamber will also come with a brass pipe mounted to a steel plate. This is a fiber tube that you can pass fiber optic cabling through. For this setup, you can refrain from installing the fiber-pipe. It is not necessary because we are using copper Ethernet cabling. screenshot
  2. First items

    screenshot
    1. Place the lamp in the chamber screenshot
    2. Place the power distribution unit (PDU) in the chamber on it's side.
    3. Plug the DC barrel connector for the fans into the fan power supply screenshot
    4. Plug the USB hub USB cable into back of the chamber. The bottom USB port is chamber USB 1 near the top ethernet filter port 3. The top USB port is chamber USB 2.
  3. Power Switch

    screenshot
    1. Port 1: USB Hub
    2. Port 2: Interior Light
    3. Port 5: 5 Chamber Fans
    4. Port 6: LANforge system
    5. Port 7: DUT
    6. Others are un-labeled. If you want to add an Ethernet switch in here, we suggest plugging it into one of the always on ports on the right side.
  4. Assemble the USB camera

    1. Your camera clamp and USB camera. Your USB camera might be manual-focus. screenshot
    2. Screw the bolt of the clamp into the tripod mount of the camera screenshot
    3. Tighten the clamp to the arm of the lamp near the top joint. The USB cable should be plugged into the LANforge when it is added. If you plug it into the USB hub, only the test-controller will be able to use it. screenshot
  5. Check espresso levels in human system

  6. Power cables

    screenshot
    1. Plug the PDU cable into the rear of the chamber
    2. Plug the USB hub power into port 1
    3. Plug the lamp cable into port 2
    4. Plug the chamber fan AC cable into port 5
    5. Plug the LANforge power-supply into port 6
    6. You will probably plug in your DUT power supply last, into port 7
  7. Inline Attenuators

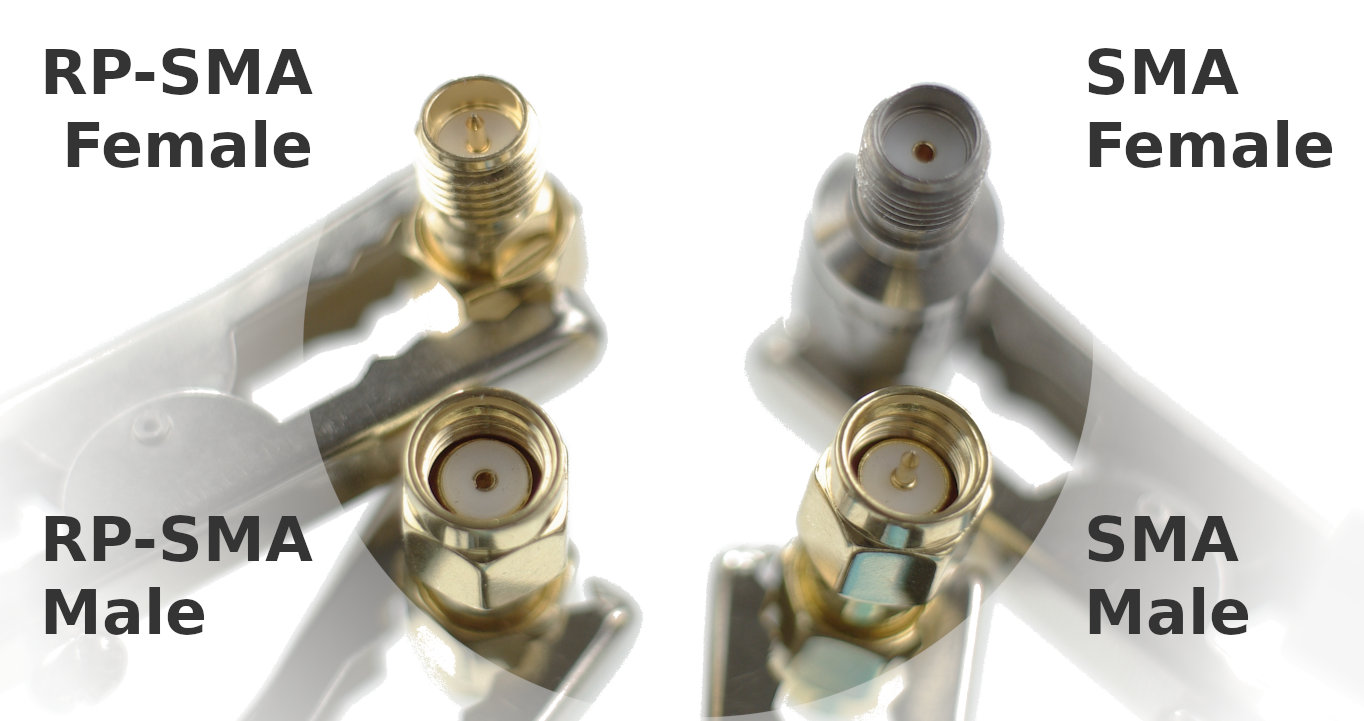
    1. This is an SMA connector chart. Make sure your antennas and in-line attenuators have the correct pins screenshot
    2. Your 16 LANforge SMA terminals are SMA-Female. screenshot
    3. Screw 16 SMA-Male/SMA-Female inline attenuators onto your CT523c. screenshot
  8. Antennas

    1. Check that you have SMA-Male antennas (antennas are with-pin). screenshot
    2. Screw on your antennas. You will not leave them straight like this. screenshot
    3. Bend the antennas various ways to ensure they provide diversity. Not providing diverse antenna orientation means your equipment will not reach desired MCS rates. screenshot
  9. Shelf for DUT

    1. You are provided two monitor stand kits as to combine into a shelf for the DUT to rest above the LANforge CT523c. You are going to use the legs from the second kit to extend the legs of the first kit. screenshot
    2. Use a utility knife or a screw driver to separate any feet from legs sections you do not need. screenshot
    3. Here is a shelf with five segments per leg. Depending on the size of the rubber feet on your CT523c, it might be just tall enough. The other photos show a table with six segments per leg. Looks like Batman likes my work. screenshot
    4. This table clears the LANforge unit well. screenshot
  10. Network and Serial Cables

    1. The network ports on the chamber are passive Ethernet RF filters. The do not have activity lights, they do not require power. screenshot
      1. The top USB3 port is USB 2
      2. The bottom USB3 port is USB 1
      3. The top Ethernet port is 3
      4. The middle Ethernet port is 2
      5. The bottom Ethernet port is 1
    2. Cable the PDU network to chamber Ethernet port 1 screenshot
    3. Place the LANforge CT523c in the chamber and attach a CAT5e cable to the management port labeled [ MGT ] screenshot
    4. Plug the management port cable into the chamber port 2 screenshot
    5. Use a CAT6 cable to connect the LANforge [ eth3 ] port to the chamber 3 port. This represents your WAN connection. screenshot
    6. Connect the DB9 female-female serial cable to the CT523c serial port. It is labled Serial: 115200 8n1. Connect the USB serial adapter to the other end of the DB9 cable. screenshot
    7. Plug the USB end of the USB serial adapter into the USB hub. Your test controller will be able to login to the LANforge for network configuration and debugging. screenshot
    8. Plug in power to the CT523c. It is a green DC connector. Place the table over the CT523c. screenshot
    9. You may place the DUT on the table. Use a CAT6 cable to connect the DUT to the LANforge [ eth2 ] port. LANforge will serve DHCP on [ eth2 ] for the DUT and its connected stations, and will NAT and route packets out of [ eth3 ]. screenshot
    10. Plug your DUT power to into PDU port 7 screenshot
    11. Your DUT probably has a serial connector. Cable your DUTs serial cable into the USB hub. screenshot
  11. Controller Setup

    1. The test controller (aka Jump Host) pictured here is a 1U rack unit. screenshot
      1. Your rack KVM will use the left USB2 ports and VGA port of the test-controller.
      2. Connect chamber port USB 1 to a USB3 port on the test-controller.
      3. You might have to use an extra USB3 hub to control more than two CT820a chambers.
      4. Cable chamber ethernet 1 to switch, this is your PDU
      5. Cable chamber ethernet 2 to switch, this is your LANforge management port.
      6. The picture shows chamber ethernet 3 connected to the switch. This connection is at your discretion. You might have a different WAN upstream network to attach to chamber ethernet 3
      7. The USB ports may be renamed each time the system restarts. To fix this, you can create an /etc/udev/rules.d/81-usb-serial.rules file that defines the USB ports by name using the serial-number of the USB cable if it supports it, or the path (effectively port to which the USB cable is connected).
        #LF on cable with serial number
        SUBSYSTEM=="tty", ENV{ID_SERIAL_SHORT}=="AK066NLY", SYMLINK+="ttyLF1", MODE="0666"
        # AP
        # In case we have something w/out a serial number
        SUBSYSTEM=="tty", DEVPATH=="1-2.1.4", SYMLINK+="ttyAP1", MODE="0666"


        You can find the appropriate information with the udevadm info -n /dev/ttyUSB0 command.
    2. In the picture the red cable represents the control network. The yellow cable is your connection to your test controller ETH0 screenshot

Candela  Technologies, 2417 Main Street, Suite 201, Ferndale, WA 98248, USA
www.candelatech.com | sales@candelatech.com | +1.360.380.1618
Facebook | LinkedIn | Blog